Pages

Tuesday, December 10, 2013

How to create an XSLT to transform AX XML data for emailing

I've been asked recently about how to send emails using an XSLT with AX for formatting and sending XML data.  I must admit, I had to visit StackOverflow for some XML pointers (credit Jason Aller).

This example will show you most of what you will need so that you can customize it to your own needs.  I will be dumping a few customer records to email with HTML formatting.

This post will build off of my previous post about properly sending emails from AX (http://alexondax.blogspot.com/2013/09/how-to-properly-send-emails-with-built.html)

After performing all of your email setup, go to Basic>Setup>Email Templates and create a new template (bottom section) under your desired email sender/language and choose under layout, XSLT.  Click "Template" on the right and put in your XSL and save. (Note: I couldn't click save, I had to close the form and it allowed me to save):


<xsl:stylesheet version="1.0" xmlns:xsl="http://www.w3.org/1999/XSL/Transform"
    xmlns:Table="urn:www.microsoft.com/Formats/Table">
    <xsl:output method="html"/>
    <xsl:template match="/">
        <html>
            <body>
                <xsl:for-each select="//Table:Record[@name='CustTable']">
                    <p>
                        <xsl:for-each select="Table:Field">
                            <xsl:value-of select="@name"/>
                            <xsl:text> : </xsl:text>
                            <xsl:value-of select="."/>
                            <br/>
                        </xsl:for-each>
                    </p>
                </xsl:for-each>
            </body>
        </html>
    </xsl:template>
</xsl:stylesheet>


In my subject, I put "Customer: %AcctNum% - %AcctName%" so that I could demonstrate how you can still pass mappings.

Then here is a simple job to show how to generate and pass the XML so that it is formatted and sent:


static void Job10(Args _args)
{
    SysEmailTable       sysEmailTable = SysEmailTable::find('XML');
    Map                 mappings;
    CustTable           custTable;
    int                 i;
    ;
    
    while select custTable
    {
        if (i>=3)
            break;

        mappings = new Map(Types::String, Types::String);
        mappings.insert('AcctNum', custTable.AccountNum);
        mappings.insert('AcctName', custTable.Name);
        

        SysEmailTable::sendMail(sysEmailTable.EmailId,
                                'en-us',
                                'alex@fakeemail.com',
                                mappings,
                                '',
                                custTable.xml(), // XML HERE
                                false,
                                'admin',
                                false);
        i++;
    }
}

Hope this helps and as always, happy DAX'ing!

Thursday, October 17, 2013

How to create a separate transaction using UserConnection to ensure your transaction is not rolled back at a higher level

Sometimes, you may have a need to have some code commit the SQL call it is making, regardless of what is happening with the code that called it, and the easiest way to do that is by creating a separate user transaction.

The reason I needed to do this was I have a static method MyCode::SendEmail(...) that would send an email and drop a log-record into a table to let me know that the email was sent.  So if it was called by some code in a transaction, and then for whatever reason, that transaction had to be rolled back, I still wanted a record of that email being sent...because it was actually sent.

So to do this, you just create a new UserConnection(), do userConnection.ttsBegin(), and then assign your table to that connection via table.setConnection(userConnection), and then a userConnection.ttsCommit() at the end.  See my attached sample job.


static void HowToCreateSeperateTransaction(Args _args)
{
    Table1          table1;
    boolean         doAbort = true;
    UserConnection  userConnection = new UserConnection();
    ;

    delete_from table1;
    
    ttsbegin;
    
    // This row "1" will only appear when the trans is not aborted
    table1.Field1 = '1';
    table1.insert();

    // This row "2" should always appear no matter what
    userConnection.ttsbegin();
    table1.clear();
    table1.setConnection(userConnection);
    table1.Field1 = '2';
    table1.insert();
    userConnection.ttscommit();

    if (doAbort)
        ttsabort;
    else
        ttscommit;
    
    new SysTableBrowser().run(tableNum(Table1));
}

Tuesday, October 15, 2013

A simple, pseudo-explanation of how AIF works, intended for a developer who wants the gist of the functionality

This is a StackOverflow response that I gave, but I thought it might be good for a blog post as well.  It explains the "gist" or central idea of how the AIF works from a programmers view, touching on how AifDocumentLog, AifQueueManager, AifGatewayQueue, AifMessageLog, etc get populated and used.

There are 4 main AIF classes, I will be talking about the inbound only, and focusing on the included file system adapter and flat XML files.  I hope this makes things a little less hazy.


  1. AIFGatewayReceiveService - Uses adapters/channels to read messages in from different sources, and dumps them in the AifGatewayQueue table
  2. AIFInboundProcessingService - This processes the AifGatewayQueue table data and sends to the Ax<Document> classes
  3. AIFOutboundProcessingService - This is the inverse of #2. It creates XMLs with relevent metadata
  4. AIFGatewaySendService - This is the inverse of #1, where it uses adapters/channels to send messages out to different locations from the AifGatewayQueue


AIFGatewayReceiveService (#1):

So this basically fills the AifGatewayQueue, which is just a queue of work.  It loops through all of your channels and then finds the relevant adapter by ClassId.  The adapters are classes that implement AifIntegrationAdapter and AifReceiveAdapter, if you wanted to make your own custom one.  When it loops over the different channels, it then loops over each inbound "message" waiting to be picked up and tries to receive it into the queue.

If it can't process the file for some reason, it catches exceptions and throws them in the SysExceptionTable [Basic>Periodic>Application Integration Framework>Exceptions].  These messages are scraped from the infolog, and the messages are generated mostly from the receive adapter, which would be AifFileSystemReceiveAdapter for my example.


AIFInboundProcessingService (#2):

So this is processing the inbound messages sitting in the queue (ready/inprocess).  The Classes\AifRequestProcessor\processServiceRequest does the work.

From this method, it will call:

  • Various calls to Classes\AifMessageManager, which puts records in the AifMessageLog and the AifDocumentLog.
  • This key line: responseMessage = AifRequestProcessor::executeServiceOperation(message, endpointActionPolicy); which actually does the operation against the Ax<Document> classes by eventually getting to AifDispatcher::callServiceMethod(...)
  • It gets the return XML and packages that into an AifMessage called responseMessage and returns that where it may be logged.  It also takes that return value, and if there is a response channel, it submits that back into the AifGatewayQueue


Wednesday, October 9, 2013

How to find what projects an object from the AOT exists in

Where I work, we are required to create a new, numbered project for every modification request.  The numbered projects have corresponding documentation for the intended purpose.

So when I later want to find out what projects an AOT object exists in, I needed a way to search inside every project.  I wrote this proof of concept job on how to find in what projects a specific object exists.  Enjoy!


static void FindWhatProjectsObjectExistsIn(Args _args)
{
    ProjectNode         pn;
    ProjectListNode     projectListNode;

    TreeNode            tn, tn2;
    TreeNodeIterator    tni, tni2;

    // Object we are searching for
    TreeNode            tnSearch = TreeNode::findNode(@'\Forms\SalesTable');
    ;

    projectListNode = SysTreeNode::getSharedProject();
    tni = projectListNode.AOTiterator();

    tn = tni.next();

    while (tn)
    {
        pn = tn; // ProjectNode inherits TreeNode
        pn = pn.loadForInspection();

        tni2 = pn.AOTiterator();

        tn2 = tni2.next();

        while (tn2)
        {
            if (tn2.treeNodePath() == tnSearch.treeNodePath())
                info(strfmt("Found in shared project %1", tn.AOTname()));

            // info(tn2.applObjectType()); // Returns the type (Form/Class/Table/Etc)
            // info(tn2.AOTname()); // Returns the object name
            // info(tn2.treeNodePath()); // Returns the object path
            
            tn2 = tni2.next();
        }

        tn = tni.next();
    }
}

Friday, September 27, 2013

How to post a ledger transaction with help from LedgerJournalEngine

This is just some sample code I put together for somebody asking how to post customer payment line(s) using LedgerJournalEngine* classes.

LedgerJournalEngine* classes are mostly used by the forms to do work and execute code before/after events and datasource actions.

It may make more sense to just complete all of the LedgerJournalTrans fields, but using the engine can't really hurt and might be more helpful in some cases.


static void Job81(Args _args)
{
    LedgerJournalEngine_CustPayment ledgerJournalEngine;
    LedgerJournalTable              ledgerJournalTable;
    LedgerJournalTrans              ledgerJournalTrans;
    NumberSeq                       numberSeq;
    Voucher                         voucher;
    ;

    // This just selects the header you are inserting into
    select firstonly ledgerJournalTable where ledgerJournalTable.JournalNum == 'GB 0056226';

    if (!ledgerJournalTable)
        throw error ("Unable to find journal table record");


    ledgerJournalTrans.initValue();

    numberSeq = NumberSeq::newGetNumFromCode(ledgerJournalTable.VoucherSeries);

    if (numberSeq)
    {
        ledgerJournalTrans.Voucher      = numberSeq.num();
        voucher                         = ledgerJournalTrans.Voucher;
    }

    ledgerJournalTrans.JournalNum       = ledgerJournalTable.JournalNum;
    ledgerJournalTrans.TransDate        = SystemDateGet();
    ledgerJournalTrans.AccountType      = LedgerjournalACType::Cust;
    ledgerJournalTrans.AccountNum       = '100003';

    ledgerJournalEngine = LedgerJournalEngine::construct(LedgerJournalType::CustPayment);
    ledgerJournalEngine.newJournalActive(ledgerJournalTable);
    ledgerJournalEngine.accountModified(ledgerJournalTrans);
    ledgerJournalTrans.AmountCurCredit  = 10;
    ledgerJournalTrans.OffsetAccountType    = ledgerJournalTable.OffsetAccountType;
    ledgerJournalTrans.OffsetAccount        = ledgerJournalTable.OffsetAccount;
    ledgerJournalTrans.CurrencyCode         = CompanyInfo::standardCurrency();
    ledgerJournalEngine.currencyModified(ledgerJournalTrans);
    ledgerJournalTrans.insert();

    if (numberSeq   && ledgerJournalTrans.Voucher   == voucher)
    {
        numberSeq.used();
    }
    else
    {
        if (numberSeq)
            numberSeq.abort();
    }

    info("Done");
}

Thursday, September 26, 2013

How to properly send emails with the built in AX framework and templates

I often see developers reinventing the wheel or using copy/paste code to send emails from X++, when Microsoft has included a very robust emailing framework to use.  It's especially important to use once you start growing and sending many emails.  This is article is focused on AX 2009, but I'd like to think it applies to AX 2012.

A few of the features that I specifically like, that I think make it more valuable than simple X++ email sending routines are:

  • Traceability - You can choose if you want a static version of an email to be retained in the database.  This easily lets you know what emails were sent, when, and the contents of the message
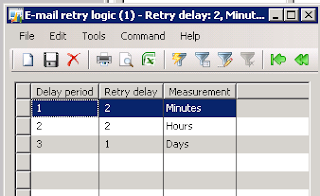
  • Retry schedule - You can setup a retry schedule in case there are failures
  • Templates - You can setup HTML or XSLT templates where you pass arguments that are plugged into the subject/body. Developers can stay concerned with technical aspects and leave the look of the email to functional users.  There is also a 'pretty' editor if functional users don't want to learn HTML.
  • Multiple language support - The framework is designed around multiple languages and labels
  • Ease of use - Once you understand the framework, attachments, priority, traceability, etc., it becomes extremely easy to use all over the system and helps reduce failure points

Relevant configuration/setup forms:
  • Administration>Setup>E-mail Parameters
    • Here you setup your SMTP parameters that are specific to your organization
  • Administration>Periodic>E-mail processing>Retry Schedule
    • Here you setup your retry schedule
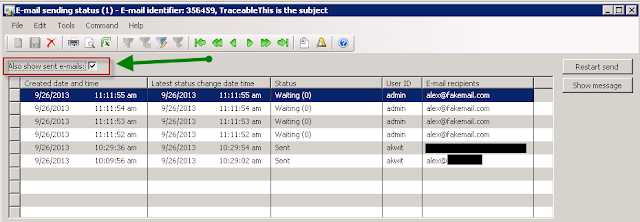
  • Administration>Periodic>E-mail processing>E-mail sending status
    • When you set emails to be 'traceable', they are queued here.  Take note of the checkbox to show sent emails
  • Administration>Periodic>E-mail processing>Batch
    • This batch is what will send emails that are awaiting in the above queue
    • This lets you control when emails get sent.  Some light customization and you could modify this if you wanted specific sending times for different groups of emails
Email templates:

Basic>Setup>E-mail Templates
  • The hierarchy is you define your sender/priority and optional batch group, then set your various email/language templates
  • If you need a different priority/sender/batch group, you need to create a new emailId (header section)
Take note of the General tab at the top, where you can set a senders priority and batch group.  If you are frequently changing email priority from the same sender, you can just create "Sender" and "SenderHigh" for example, then switch between those two.

The bottom section is where you can create the actual email templates for the different languages.  In the subject, you can put a default subject, or a custom replaceable "variable" such as %subject% or %AnythingYouWant%.

There are two available layouts, HTML and XSLT.  I will be working with HTML, but I will comment on XSLT.

After clicking "Template", you see where you actually type up the email template you want to use.

The variables need to start and end with the % sign, and they can be anything you want.

Once these basic setups are done, the code is easy and very re-usable.  One thing to note about the "traceable" parameter is that when you set it to false, one of two things will happen.  If your email sender has a batch group, then it will create a batch job and immediately execute, or it will just immediately send the email if it does not.


Here is a copy/paste version of the code:

static void SendEmailIntoQueueSimple(Args _args)
{
    SysEmailTable   sysEmailTable;
    Map             mappings        = new Map(Types::String, Types::String);
    // str             xml;
    ;

    // Build your variable/text mappings
    mappings.insert('subject', 'My Subject Here');
    mappings.insert('word1', 'This replaces word1');
    mappings.insert('word2', 'This replaces word2');
    mappings.insert('body', 'This will replace body with this string and this ' +
                            SysLabel::labelId2String(literalstr('@SYS25058'), 'en-us'));
    mappings.insert('TheseCanBeAnythingYouWant', 'More text');

    sysEmailTable = SysEmailTable::find('Custom');


    /*
    // If you were using XSLT, here is an example of how to build the XML
    // but you would most likely create your own static method
    xml = EventActionEmail::createEmailParameterXml(mappings);
    */

    SysEmailTable::sendMail(sysEmailTable.EmailId,
                            'en-us', // Chosen language
                            'WhoYouSendThisTo@fakemail.com', // Who you're sending the email to
                            mappings, // Your variable mappings
                            '', // Location of file attachment (server/client matters) or none
                            '' , // XML if you're using XSLT
                            true, // Traceable or not?
                            'admin', // Sending user
                            true); // Use retries?

    info("Done");
}

This is the actual email I received, where you can see the substitutions were done.


Hopefully, this post will be informative, and if I left anything out, please comment.  Happy DAX'ing!

Tuesday, July 30, 2013

Minor bug with base journal posting framework and fix

This is a bit of a frustrating bug that took some time to figure out.  This bug occurs when you are trying to fork to different journal transaction forms.  You will see it most likely when you click the "lines" button and nothing happens after the first click, and you don't know why.

An example of forking to different transaction forms can be seen from the production journals located at AOT\Forms\ProdJournalTable, where depending on your journal type, a different ProdJournalTrans* form is launched.

The bug/logic failure is located at Classes\JournalFormTable\fieldModifiedJournalNameIdPost(), and it only happens when you create a new record, select your journal name, and click on "lines" without saving.

Essentially what happens is the JournalTableData object is instantiated inside the JournalFormTable with a blank record, but the blank journal type enum is 0, which is also the first enum.  So later on, when the controls are trying to be initiated, it will set the menu item for the "Lines" button based on what your *JournalStatic\menuItemStrLines returns.  And that will return whatever the default 0 enum is.

The quick fix is, in your [Table_ds].JournalNameId\modified method, the standard code is this:

void modified()
{
    super();

    journalFormTable.fieldModifiedJournalNameIdPost();
}

You can just call the datasourceActivePre() method to reinitialize the JournalTableData's JournalTable after the correct journal type is filled as seen below:

void modified()
{
    super();

    journalFormTable.datasourceActivePre();
   
    journalFormTable.fieldModifiedJournalNameIdPost();
}

I'm guessing that very few people will come across this bug, but hopefully it helps someone.