I often see developers reinventing the wheel or using copy/paste code to send emails from X++, when Microsoft has included a very robust emailing framework to use. It's especially important to use once you start growing and sending many emails. This is article is focused on AX 2009, but I'd like to think it applies to AX 2012.
A few of the features that I specifically like, that I think make it more valuable than simple X++ email sending routines are:
- Traceability - You can choose if you want a static version of an email to be retained in the database. This easily lets you know what emails were sent, when, and the contents of the message
- Retry schedule - You can setup a retry schedule in case there are failures
- Templates - You can setup HTML or XSLT templates where you pass arguments that are plugged into the subject/body. Developers can stay concerned with technical aspects and leave the look of the email to functional users. There is also a 'pretty' editor if functional users don't want to learn HTML.
- Multiple language support - The framework is designed around multiple languages and labels
- Ease of use - Once you understand the framework, attachments, priority, traceability, etc., it becomes extremely easy to use all over the system and helps reduce failure points
Relevant configuration/setup forms:
- Administration>Setup>E-mail Parameters
- Here you setup your SMTP parameters that are specific to your organization
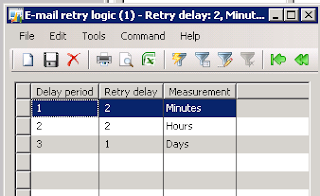
- Administration>Periodic>E-mail processing>Retry Schedule
- Here you setup your retry schedule
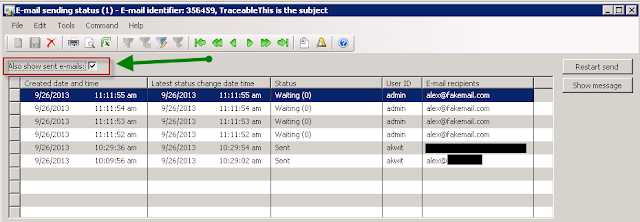
- Administration>Periodic>E-mail processing>E-mail sending status
- When you set emails to be 'traceable', they are queued here. Take note of the checkbox to show sent emails
- Administration>Periodic>E-mail processing>Batch
- This batch is what will send emails that are awaiting in the above queue
- This lets you control when emails get sent. Some light customization and you could modify this if you wanted specific sending times for different groups of emails
Email templates:
Basic>Setup>E-mail Templates
- The hierarchy is you define your sender/priority and optional batch group, then set your various email/language templates
- If you need a different priority/sender/batch group, you need to create a new emailId (header section)
Take note of the General tab at the top, where you can set a senders priority and batch group. If you are frequently changing email priority from the same sender, you can just create "Sender" and "SenderHigh" for example, then switch between those two.
The bottom section is where you can create the actual email templates for the different languages. In the subject, you can put a default subject, or a custom replaceable "variable" such as %subject% or %AnythingYouWant%.
There are two available layouts, HTML and XSLT. I will be working with HTML, but I will comment on XSLT.
After clicking "Template", you see where you actually type up the email template you want to use.
The variables need to start and end with the % sign, and they can be anything you want.
Once these basic setups are done, the code is easy and very re-usable. One thing to note about the "traceable" parameter is that when you set it to false, one of two things will happen. If your email sender has a batch group, then it will create a batch job and immediately execute, or it will just immediately send the email if it does not.
Here is a copy/paste version of the code:
static void SendEmailIntoQueueSimple(Args _args)
{
    SysEmailTable   sysEmailTable;
    Map             mappings        = new Map(Types::String, Types::String);
    // str             xml;
    ;

    // Build your variable/text mappings
    mappings.insert('subject', 'My Subject Here');
    mappings.insert('word1', 'This replaces word1');
    mappings.insert('word2', 'This replaces word2');
    mappings.insert('body', 'This will replace body with this string and this ' +
                            SysLabel::labelId2String(literalstr('@SYS25058'), 'en-us'));
    mappings.insert('TheseCanBeAnythingYouWant', 'More text');

    sysEmailTable = SysEmailTable::find('Custom');


    /*
    // If you were using XSLT, here is an example of how to build the XML
    // but you would most likely create your own static method
    xml = EventActionEmail::createEmailParameterXml(mappings);
    */

    SysEmailTable::sendMail(sysEmailTable.EmailId,
                            'en-us', // Chosen language
                            'WhoYouSendThisTo@fakemail.com', // Who you're sending the email to
                            mappings, // Your variable mappings
                            '', // Location of file attachment (server/client matters) or none
                            '' , // XML if you're using XSLT
                            true, // Traceable or not?
                            'admin', // Sending user
                            true); // Use retries?

    info("Done");
}
This is the actual email I received, where you can see the substitutions were done.
Hopefully, this post will be informative, and if I left anything out, please comment. Happy DAX'ing!


